BOM's away......
Okay,
here goes. Now I will start this by saying this is only the second
time I have written a tutorial so let me know if you think there is
anything I have left out or any changes I need to make.
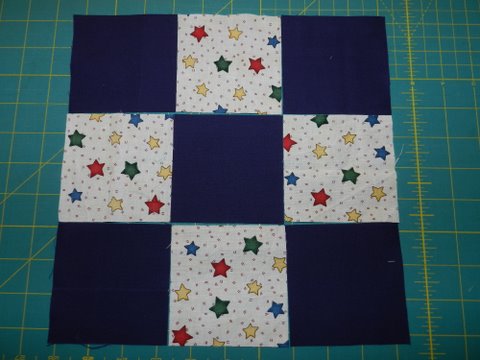
Our first BOM is the NINE PATCH.
I
did warn you that we would start with a simple block as some of our
stitchers are novice quilters. And besides, I love the nine patch for
it's humble versatility. Here are three nine patch quilts that have
already been sent off to Afghanistan. They are all different but they
are all based around the humble nine patch. Love 'em!


So,
gather your fabrics. You need at least two - one light and one dark.
From the light fabrics cut four 3 1/2 inch squares and from the dark
cut five 3 1/2 inch squares. We will be making a block that looks like
this.
Next
most important step is to select your quarter inch foot. Seam
allowance is really crucial when a bunch of quilters are sewing blocks
for a combined quilt. Even in our quilt group, full of experienced
quilters, we find that all our quarter inch seams are not the same. So,
grab your quarter inch foot - this is what mine looks like.


Now
grab some scraps and sew a practice seam. Check that it is an accurate
quarter inch and adjust the needle position if it isn't. In this case,
just do your best. I can trim a little if I need to if the blocks
aren't all exactly the same.

Next pin together a dark square and a light square. Repeat and pin two more pairs.

Sew your squares together.

Once you have sewn all the pairs together, iron them with the seams towards the dark square.

Now get your remaining three squares and pin to the pairs like this.

Again press all your seams towards the dark square

Take the strip that has the dark square in the middle and one of the other strips and pin together through the seams.

I like to pin on the diagonal as it holds both seams to a certain extent.

Here is the rear view.

Again
iron the seams towards the two dark squares. The middle part of the
seam will be towards the light - that is fine. Once you have sewn those
two strips together, pin the final strip to the other side of the strip
with the dark centre and sew. Press the seams again as before. Now
sit back and pat yourself on the back, you have just made a nine patch.
You can now repeat as many times as you like.

Here are some I prepared earlier.

Now, some admin.
Blocks can be made with any combination of lights and darks and not all
lights and darks in the one block have to be the same. Remember I am
teaming them with this red so perhaps avoid red unless you limit it to
the middle of the block.

The
last date for posting nine patch blocks to me is February 29! If you
post after that they may have to wait for another quilt or quilts to be
included in. If you are posting some can you please let me know how
many so that by the time they arrive I will have a layout worked out and
can start working on them. if you are an overseas quilter and you want
to join in the fun feel free but it you could post yours a bit earlier -
say around the 20th of Feb that should allow for most of the blocks to
be here together. You can make one block or more - your choice. I am
sure there are some of you that absolutely won't be able to stop at
one......like me!
I hope that makes sense to all of you - leave me a comment if you are joining in and also if you have any questions.
Till next time.......keep spreading the word and happy stitching!
PDF version available by clicking HERE
Please note, this tutorial was copied over from the main Aussie Hero Quilts blog and any dates noted, are no longer applicable.